

How To Install Paneling Video
Installing solar panels past yourself tin can be a toll-effective and rewarding feel; you can save a significant amount of money by cutting contractors out of the equation and take pride in your ain handiwork.
However, for the aspiring solar DIY-er, knowing how to install solar panels can seem daunting. Fear not! Whether yous're considering a grid-tie system or an off-grid solution, we've created a comprehensive, pace-by-step solar panel installation guide to help you through each stage of the solar installation process.
Table of Contents
- Part i: Solar Installation Planning & Rubber
- Materials to Purchase
- Unboxing
- Safety Considerations
- Office ii: Wiring & Electrical
- Wiring Management
- Electrical Connectedness
- Planning Your Electric Route
- Mounting Your Inverter
- Grounding Your System
- Part iii: Mounting Your Panels
- Roof Mounting
- Ground Mounting
- Part 4: Solar Battery Installation
- Rubber Tips
- Battery Room Designs
- Battery Depository financial institution Installation
- Bombardment Wiring
Solar Installation Planning & Safety
The key to any successful solar console installation project is having a conspicuously constructed plan with measures in place to ensure the safety of everyone involved.
In fact, there are a few things you can practise before you fifty-fifty unpack your system to brand certain the solar installation process goes smoothly from commencement to cease. These include:
- Purchasing materials that are not included in your shipment (wiring, tools, etc.)
- Staying organized while unboxing your system
- Inspecting your shipment to ensure zippo is missing or damaged
- Reviewing safety guidelines for installing your system
Materials to Purchase
Our packages include equipment and materials to help yous with a successful installation. In addition to what'south included in our packages, gather additional equipment and materials needed for installing solar panels, including:
Wiring
Your electrical wiring diagram will outline the size and length of wire needed for your project. Ask for a copy of your wiring diagram to source materials from your local hardware store.
Junction Boxes & Splices
- Utilise insulated lugs or other approved splicing devices (no wire nuts for DC splices).
- All junction and splice boxes must meet the voltage and amperage requirements for the excursion they are role of.
- Outdoor boxes must be rated for outdoor apply.
- Basis splices typically require an irreversible splice.

Air-conditioning Breakers & Sub-Panels
- AC breakers are required to import/export AC power from your equipment.
- Circuit breakers have several dissimilar mounting options. Bank check your AC breaker panel for a list of uniform options.
- Defended sub-panels are frequently used to combine Air-conditioning solar circuits. Sub-panels do non allow for load breakers to be placed within of them.
- Air conditioning sub-panels must exist sized with plenty headroom to cover the output coming in from the solar circuits.
Air-conditioning Disconnects & Fuses
- Most systems require a lockable prophylactic disconnect.
- A conventional connectedness that backfeeds the grid volition require a non-fused manual Air conditioning Disconnect. This may be included with your arrangement—cheque the parts list on your quote/order grade.
- A line-side tap connection will crave a fused manual AC disconnect. The fusing provides the necessary overcurrent protection for the circuit.
- AC disconnects must be mounted exterior, generally inside 10 feet or in directly line of sight of your chief billing meter. Check with your AHJ (Authority Having Jurisdiction) for specific details on placement requirements.
PV Meters
- If you're installing a grid-tied organisation, your utility may require a dedicated PV meter to measure production coming from the solar array.
- In many cases, you merely need to install the meter socket or base. The utility company volition install the meter confront one time you are approved to actuate the organisation.
- Contact your utility company for a listing of approved meter sockets.

Conduits & Meters
- The NEC (National Electric Code) requires solar wiring to be transitioned to conduit earlier leaving the array. EMT (electrical metallic tubing) is required unless otherwise specified.
- You can employ larger conduit than specified if necessary, to ease the conductors in. Never use smaller conduit than what is spec'd in your plans.
EMT vs. ENT Conduit
EMT is a sparse-walled, rigid raceway that must be grounded. It is most ever fabricated out of steel. EMT must be used unless your local dominance approves ENT conduit for your project.
ENT is a not-metal, pliable raceway that does non need to exist grounded and can be bent past hand. ENT is more cost-effective and easier to piece of work with, simply is non allowed nether most edifice codes.

Mounting Materials
Ground Mounting — Ground mounts require concrete, form bracing and 2- or 3-inch mechanical tubing. Since these materials are plush to transport, it's cheaper to source them locally. Your racking report will specify the total linear feet of pipe and cubic yards of concrete required for the project.
Yous will too need lumber to build a frame to hold the pipes in identify while the concrete cures. This helpful guide from IronRidge explains how it works. The ground mountain department of this solar console installation guide too contains more information on building a substructure.
Roof Mounting — Buy several tubes of roof sealant to preclude leaks and wind damage. Make sure you get a sealant that is advisable for use with your roof material.
Likewise, consider buying a good drill if y'all don't own i. You will be using a long 1/8 inch drill scrap and a 7/16 inch deep socket for lag bolts.

Unboxing
After your system arrives, there is a 24-hour window from commitment to submit shipping claims to Unbound Solar. Unpack your arrangement immediately when it arrives to check for damage or missing parts.
- Find a clean, open infinite where you can unbox and inspect your equipment.
- Identify loose parts into resealable plastic bags and label them and so they don't get lost.
- Check the contents of the shipment against the packing listing to verify everything is there.
- If in that location are whatever missing or damaged items, take photos for reference and contact Unbound Solar immediately to fix the issue.
- If you don't plan to install right away, identify batteries on a charger ASAP. Batteries tin fail if they sit for an extended period of time without charging.
- If y'all bought micro-inverters or power optimizers, continue any documentation with stickers or QR codes. These will exist used to create an array map later on so you know which unit controls which panel.

Safety Considerations
Since solar installation involves heavy lifting, electrical work, and potentially climbing on your roof, safety should be prioritized at all times. After all, what expert is a shiny new solar system if you're not around to enjoy its benefits?
Use our solar panel installation guide for ensuring the safety of yourself and others throughout the installation process.
Protective Equipment
Solar equipment can cause cuts, scrapes, lacerations, gouges, and puncture wounds. Use the proper equipment and remember to take breaks to avoid getting drawn.
- Wearable middle protection, gloves, and airtight-toe boots at all times.
- Remove all metallic jewelry, including watches.
- Wear long sleeves when mixing concrete to avoid burning your peel. Use a roof anchor and safety harness for roof piece of work.
Autumn Protection (Roof Mounts)
If you are installing a roof-mount system, fall protection is required whatsoever time you or your helpers are on the roof.
- Install roof anchors.
- Utilise a safety harness attached to the ballast any fourth dimension you are on the roof.
- Roof-ready boots with flat soles can assist go a grip on roof shingles, tiles, or metallic.
- Consider renting scaffolding and/or a boom-lift to brand information technology easier for people and equipment to get to loftier places.
- Be enlightened of weather condition conditions which may make rooftop work temporarily unsafe.

Dig Rubber (Ground Mounts)
Even if your feet are firmly planted on the ground, there tin however be danger afoot. If y'all're ground mounting your panels, be sure to always find the following safety precautions.
- Call the local authority before starting whatever digging projects to avoid hitting cached gas or electrical lines.
- If you employ a concrete truck, don't drive over septic or drainage lines, and avoid
low-hanging power or telephone lines. - Avoid contact with moisture concrete, which can cause caustic burns on bare pare. Wear gloves, eye protection, and long sleeves.
- Use an N-95 respirator mask if you are mixing your ain concrete to avoid inhaling harmful chemicals.
- If yous use heavy equipment, get preparation on how to operate the equipment, or have an experienced operator on site.

Electrical Prophylactic
- Remove all metallic jewelry, including watches.
- Go on a multimeter on hand. Check conductors and terminators to confirm there are zero volts nowadays before proceeding.
- Ensure that all wires are stripped and/or terminated properly using a torque wrench/driver when necessary.
- Route wires away from sharp edges and compression points that could damage the wire.

Heavy Lift Safety
- Program your lift; know what you are moving and where before lifting.
- Have two or more than people conduct panels in heavy winds to avoid accidents.
- Be sure your footing is stable.
- Lift with your legs by squatting so you don't put added stress on your back.
- Avoid twisting while lifting and keep the weight shut to your body.
- Ask for help when you demand it and look for help when you lot have to. If you aren't certain whether you tin can elevator something solitary, err on the side of caution.
- Utilize a hoist or crane to lift heavy equipment if necessary.
Wiring & Electrical
Wiring your electrical run is a critical part of whatsoever solar installation, and the specifics differ based on the kind of system you lot're installing. This section of the solar console installation guide volition outline how to plan your wiring run, ground your system, and install a backfeed breaker to connect to the utility filigree if needed.
Wiring Management
Wiring management is an important (though frequently overlooked) consideration that volition make your solar panel installation easier in the long run. Here are a few tips to go on in mind:
- Programme the wiring run in advance so the wires don't interfere with access to the array.
- Employ wire clips to secure the manufacturing plant wire leads in place and then they don't move in the air current or bear upon the roof (required under the National Electric Lawmaking). Wire clips allow you to run the wires forth the rails or the frame of the solar panel.
- Many solar components use jump clamps, which crave you to push down on a metal bar (or another machinery) to open the terminal so you tin can seat the wire. Once the wire is firmly seated, release the leap, which clamps the wire in place.
Electric Connexion
The actual path of your wiring system volition differ based on the type of system you lot're installing. Below are some summaries showing how wiring is connected for each system type:
Grid-Tie Wiring Path (Centralized SolarEdge / SMA Inverter)
- PV strings to junction box
- Junction box to inverter(due south)
- AC Out to principal/sub-panel
Y'all tin can check out SolarEdge'south HD-Wave solar panel installation video or SMA's Sunny Male child installation video for in-depth demonstrations of the wiring process.
Grid-Tie Wiring Path (Enphase Micro-Inverters)
- PV console to micro-inverter
- Micro-inverter to trunk cable
- Trunk cables to junction box
- Junction box to main panel
Enphase has a detailed solar panel installation video you tin can scout for a easily-on demonstration of the wiring process.
Off-Grid Wiring Path
- PV strings to combiner box
- Combiner box to charge controller(s)
- Charge controller(s) to battery depository financial institution
- Battery bank to inverter(due south)
- Inverter(s) to load panel
- The generator also wires into the inverter (separate from the solar circuit
Assortment Maps for Micro-Inverters/Optimizers
If your system uses micro-inverters or ability optimizers, it'southward a expert thought to brand an array map that identifies where each device is located in the assortment.
These products come with stickers, QR codes or other unique identifying markers. Attach these stickers to a slice of paper to make a map of the array.
During commissioning, plug this array map into your monitoring software to tell it the location of each panel in the assortment. This allows the software to properly monitor production and written report lacking equipment.

Off-Grid DC Wiring
- Off-grid systems tend to have more than wire terminations and piece of work with higher amperages. Bank check all AC, DC, and communication connections to be certain everything is properly connected and torqued.
- Mark connections with a paint pen later yous tighten them so you know which connections have been torqued.
- If yous bring combined DC power from a solar panel array to a power center, accept care to terminate your solar positive wire at the SOLAR INPUT (+) busbar, not the DC BATT (+) busbar.
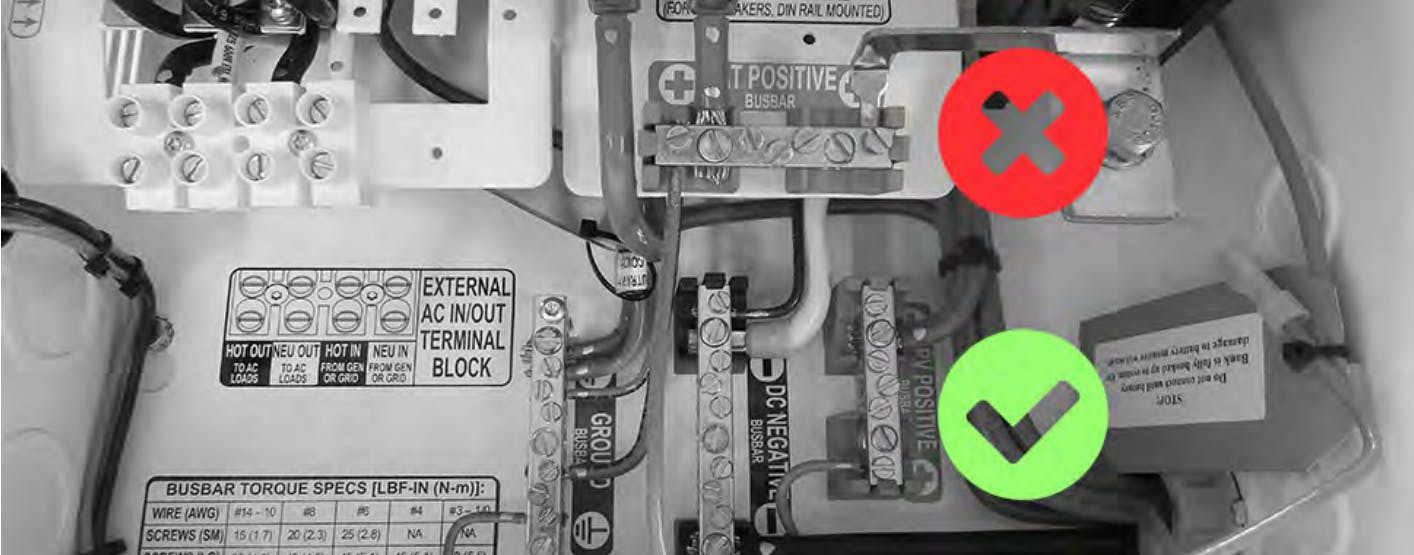
- After wiring, check terminals or busbars with a meter and determine they are operating at a prophylactic voltage before proceeding with the rest of your build.
Planning Your Electric Route
Y'all'll want to program your electric run beforehand, taking into consideration which type of system you're installing.
Again, safety is of the utmost importance: make certain you wear the recommended protective equipment (gloves, centre protection, and airtight-toe boots) and install the wiring according to your wiring diagram.
PV Sub-Panels
- Systems with multiple inverters can use an Air conditioning sub-panel to combine the Air conditioning circuits into a single set up of conductors.
- Dedicated solar sub-panels must not contain whatsoever load breakers.
Roof Mount Electrical Route
- You can run your wiring through your attic to hibernate it from view, simply make sure it is accessible to connect to the array, breaker box, panel, meter, and other parts of the system.
- Employ cablevision clips to secure wiring from solar panels and micro-inverters/ability optimizers. The clips should concord the wires in identify during strong winds.
- Exercise not allow exposed wiring to make contact with the roof surface.
- Run the wiring from the solar source to a junction box, then transition to your conduit run. The wiring must remain in the conduit run until information technology reaches the inverter (for filigree-tie systems) or charge controller (for bombardment-based systems).
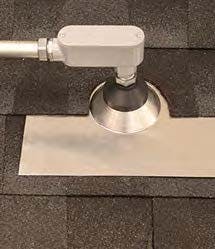
- Use conduit mount flashings to secure rooftop conduit runs in place.
- If possible, use conduit penetration flashings to transition conduit into your attic to hide it from view.
Footing Mount Electrical Route
- Employ cable clips to organize exposed wiring under the assortment. They should exist secured confronting potent winds and kept out of the way so they don't interfere with maintenance.
- Call the local authority before starting any earthworks projects to avoid striking cached gas or electrical lines.
- If y'all use a concrete truck or other heavy machinery, don't drive over any buried gas lines, plumbing, or septic systems that could be damaged.
- Your wiring diagram will tell y'all how deep to dig your trench, the size/type of wiring and conduit required, and the total altitude of the run. It will likewise take voltage drop/voltage rise into business relationship. Refer to it often as you plan your run.
Mounting Your Inverter
Inverter installation tin wait different depending on the solar system blazon. Inverters for grid-tie systems tin be wall-mounted indoors, outdoors, or rigged on the back of a footing mount substructure. Off-grid inverters must be wall-mounted indoors.
Wall-Mounted Inverters (Grid-Tie & Off-Grid)
- Follow manufacturer guidelines for installation clearances to ensure that the equipment tin cool effectively.
- Inverters with integrated disconnect switches must be mounted less than 2 meters (6.5 feet) off the ground. The exception to this is if the system design contains another switch that meets the AC disconnect requirements of the NEC (National Electric Code).
- If installed in a garage, any ignition source (inverters and disconnects) must exist at least 18 inches off the ground.
- If installed outside, keep the inverter out of direct sunlight and clear of any sprinkler systems.
Inverters Mounted on Ground Mount Substructure (Grid-Tie Just)
- Mount the inverter college than 36 inches off the ground to avert mud splatter during heavy rains.
- Go along the inverter out of straight sunlight.
- Employ threadlocker on the hardware that secures the inverter subclass to the support construction.
If you lot desire to larn more, cheque out our commodity on solar inverters.
Grounding Your Organization
Properly grounding the electric components of your solar system is an essential step. For 1, grounded electrical connections reduce the hazard of shock, power surges, and build-up of static electricity. Moreover, if the circuit fails, grounding allows a safe pathway for fault current.
Metal parts of an electrical system must exist connected (bonded) to the ground, and conductive materials (EMT, metal boxes, etc.) must exist grounded together. The latter ensures that each piece of equipment in the organisation shares the same resistance to the footing, or "footing reference."
The following sections of our solar panel installation guide outline grounding methods and some extra tips to help you ground your system properly.
EGC and GEC Grounding
- EGC (Equipment Grounding Conductor) is the light-green or bare copper wire that connects the racking hardware, metallic enclosures, and EMT conduit together.

- GEC (Grounding Electrode Conductor) is the wire connecting the ground rod to the electrical distribution service. In most Ac power systems, the neutral conductor has a single bonding bespeak where it is connected to the ground.

- Neutral to ground bonds can exist found in generators, breaker distribution panels, power centers, and other equipment. Your system should only take a single neutral-to-ground bail.

- A DC negative to ground bond is necessary for any organization. It is included with whatsoever arrangement that features "ground mistake protection."

Integrated Grounding
- IronRidge's UFO (Universal Fastening Object) and bonded fasteners brand it so that an entire solar array can be grounded with a single grounding lug.
- Other mounts, like pole mounts, will not accept integrated grounding solutions. Each panel and racking component needs to be grounded using UL listed grounding clips or lugs.
Backfeed Breaker Installation (Filigree-Tie Only)
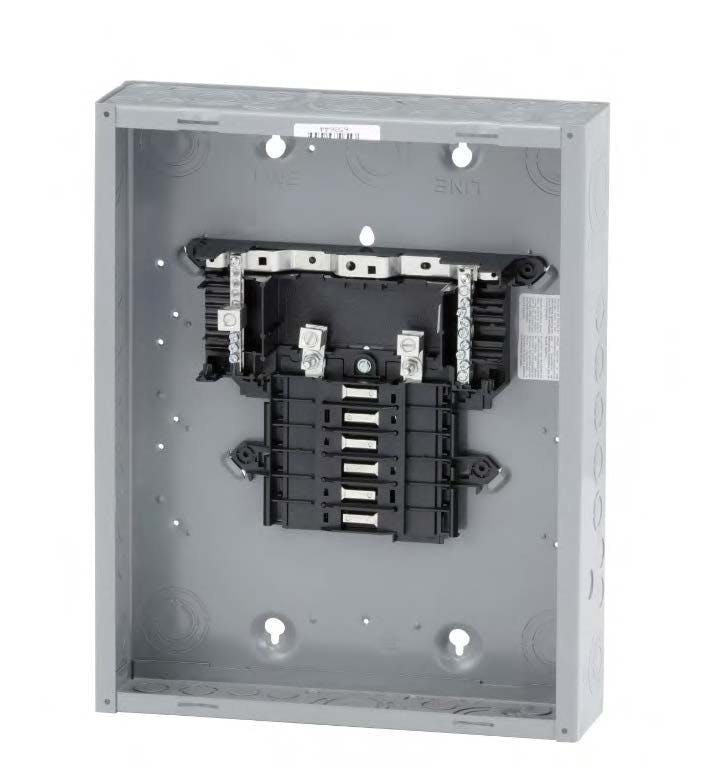
Filigree-tie solar systems crave a backfeed billow, which is a device added to your chief billow console. This enables your system to feed the power it generates into the utility filigree.
A solar backfeed billow is installed at the opposite finish of the billow panel from the filigree input billow. You lot may need to re-arrange circuits in the breaker panel to put the solar breaker in the final position.
If you demand to make room for an extra billow, Tandem Breakers make a unmarried slot on the breaker panel that serves two circuits on the aforementioned phase (these are unlike from 120/240-volt multi-stage breakers).
How to Install a Backfeed Breaker
If yous're not comfortable working on your breaker panel, don't be afraid to call a professional electrician. Many of our customers DIY their solar array and bring in a professional for the electrical work.
That said, if yous're comfortable (and safe!) with this kind of work, here's a footstep-by-step outline of how to get a backfeed breaker hooked up:
- Determine the proper breaker size and source a breaker that will work with your existing panel. It'southward ideal to utilise the same brand and model every bit other breakers in the panel.
- Equally you work, stand on plywood or a rubber mat to insulate yourself from the basis. Y'all will want to gather insulated tools and a voltmeter with fresh batteries earlier you lot brainstorm.
- Shut off the branch circuit breakers one at a time.
- Shut off the principal circuit breaker.
- Remove the console cover.
- Test all the wires with a multimeter to brand sure there's no current earlier proceeding.
- Disconnect the wire of the breaker you're removing from the load terminal.
- Carefully pull out the one-time breaker, paying close attention to how it's positioned.
- Insert the new breaker and push it into position.
- Attach the properly stripped solar circuit wires to the billow terminals and torque into place.
- Audit the console for whatever other problems. Tighten any loose terminals.
- Replace the panel cover.
- Plough on the main breaker.
- Turn on the branch breakers one by one, leaving solar for terminal. Do non turn on the solar backfeed breaker until afterward inspection and interconnection understanding are completed.
- Test the breakers with a multimeter to make sure everything works.
Mounting Your Solar Panels
With a solid wiring & electrical plan in place, the next stride is mounting your solar panels. Whether you determine to roof mount or ground mount your array, the following sections volition outline everything you need to build a solid mounting foundation.
Roof Mounting
If you lot decide to roof mount your solar panels, there are 5 main steps to take:
- Locate and marking roof rafters
- Install roof attachments to secure your rails in identify
- Install racking rails
- Elevator panels on to your roof
- Mount panels on your track
Step ane: Mark Roof Rafters
For a sturdy foundation, roof-mount flashings should be bolted to your roof rafters. There are a couple of methods for locating where exactly your rafters are:
Visual Location
Look for rafters nether the eaves of your roof. If yous can't spot them, expect for the nails that hold the fascia board and/or gutter to the ends of the rafters.
Echo Location
If information technology'due south rubber, yous can get a feel for where your rafters are past walking around on your roof. The rafters will feel firm, while the infinite betwixt them will feel a little spongy. You can likewise apply a rubber mallet to tap around on the roof and mind/feel for the rafters.
This method is less effective on roofs with skip sheathing (a layer of boards that sit perpendicular to the rafters). The boards cover the rafters, which makes it difficult to know whether you've constitute a rafter or a skip sheathing board.
Exploratory Drilling
If none of the previous methods piece of work, you can drill exploratory holes in your roof to search for rafters.
- Get-go where yous plan to identify your commencement flashing and drill a small hole in your roof.
- If the drill does not hit a rafter, bend a metal wire into an L shape and insert it into the pigsty.
- Rotate the wire to see if it hits a rafter.
- One time a rafter is found, measure 0.75 inches from the border to the eye of the rafter. Marking this location so you tin can drill the lag commodities directly through the center of the rafter.
- If you take attic access, you can follow this procedure from the inside of the attic. Drill a pigsty on one side of the rafter, leaving the drill bit sticking through the roof so you lot can locate it from the exterior. Once you climb on the roof, measure 0.75 inches from the drill flake to the center of the rafter to mark the location of the lag bolt.
Mark Rafters with Chalk Lines
Once yous marking both endpoints of each rafter, you tin connect them with a chalk line on acme of the roof. This will requite you a visual indication of where to line up your flashings. The chalk volition launder away the next fourth dimension it rains, and then don't worry about the lines being permanent.
- Attach the chalk line at the starting point of the line.
- Pull the string loaded with chalk out of the chalk reel.
- Secure the chalk line at the endpoint of the line.
- Use your finger to press the middle of the chalk line confronting the roof.
- Pull up on the line, then let get and so it "snaps" against the roof. The impact will leave a temporary line of chalk for you lot to work from. Do this on both sides of the bespeak where you are holding the line in identify.
- Repeat until you lot take marked the location of each rafter in chalk.
Step 2: Install Roof Attachments
With the location of your roof rafters marked, it'south fourth dimension to start installing the attachments that will secure your mounting rail in place.
Depending on the blazon of roof you have, the process will differ, but nosotros've included steps for the virtually mutual types below, along with some tips on spacing and layout for flashings.
Spacing and Layout Tips
Your flashings should exist spaced to align with the mounting holes on your solar panel. The distance betwixt mounting holes will be listed on the console spec sail.
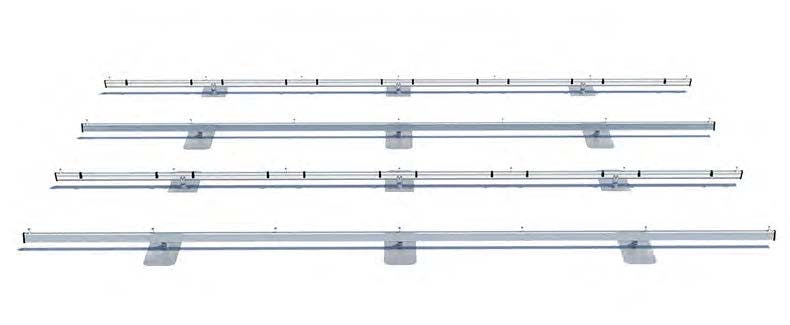
Stagger the flashing layout then that they alternating between the pinnacle and bottom rail. Distribute the flashings evenly across all your roof rafters to spread the weight of the array across the unabridged mounting surface.
The layout on the left is more visually appealing, but all of the wind/snow load is concentrated on a few rafters. The staggered layout on the right makes for a more structurally audio array.
Blended / Cobblestone Shingle Roof
Our systems unremarkably apply the Ironridge Flashfoot 2 flashing organization for composite/asphalt shingle roofs, then nosotros've included installation instructions for that production hither. If your organisation uses different flashings, consult the manufacturer's manuals for installation instructions.
- Gently break the seal between the shingles with a flat bar.
- Remove any nails that would forbid y'all from sliding the flashing nether the shingle.
- Slide the flashing under the shingle, lining up the hole with the marked rafter.
- Tuck the flashing into place. The lesser edge of the flashing should sit above the drip line (the bottom edge of the shingle). The acme edge of the flashing should attain into the third course of shingles (see reference image).
- Mark the drilling location through the hole in the flashing.
- Remove the flashing and drill a airplane pilot hole using a 7/32 inch drill flake. Double-check to make certain the pigsty is in a rafter.
- Fill up the hole with roof sealant and place the flashing.
- Use an impact drill with a i/ii inch deep socket to tighten to the flashing manufacturer'south specifications.

Metal Roof
Metal rooftops employ roof clamps that either attach onto a seam or commodities into the structure. There are dozens of clench configurations and each one is a little bit different, depending on the rooftop. Check with the clench manufacturer for specific installation instructions.

Tile Hooks
Tile hooks slide under the shingles and fasten to the rafters. A vertical hook provides clearance from the roof tiles. Your racking rails commodities into slots in the tile hooks. Tile hook installation may require some cutting or grinding of tiles, merely they are by and large universal and piece of work on nigh tile rooftops.

Tile Replacements
If you lot bought a tile replacement system, you will remove tiles on your roof and swap them out for the tile replacement flashing. A lag commodities is bolted to the rafter through the tile replacement, which serves equally a foundation to attach the rails.

Ballasted Mounts for Depression-Gradient/Flat Roofs
Ballasted mounts practice not require y'all to make penetrations in your roof—the weight of the racking base and the assortment itself holds the system in place.
Ballasted mounts only work on flat or low-slope roofs. Higher tilt angles mean less down force holding the array in place, which makes them ineffective on steeper rooftops.

Step 3: Install Racking Rails
With the flashings in place, y'all're ready to adhere the racking rails. Be sure to proceed your Racking Report handy during this footstep–information technology specifies rail size and spacing for your system.
- Measure and cutting your track on the footing and so you lot don't go metallic shavings on your roof.
- Rails should exist spaced to friction match the distance between the mounting holes on the dorsum of the solar panel frame. The flashings demand to match this spacing besides.
- Use the supplied hardware to attach the rail to the flashing. (Pro tip: install the lower track flashings on the upslope side of the rails then that the array hides the flashings from view.)
- Use a level to ensure the rails are even. The slots in the L-anxiety allow for vertical adjustment if needed.
- Tighten rails with a quality torque wrench according to the manufacturer's torque specs.
- Attach plastic stop caps to keep spiders, bees, and other critters out of the track.
- Attach wire management clips and any hardware for micro-inverters/optimizers to the rails.
- Install grounding equipment as you install your runway. IronRidge systems contain i grounding lug per array.
- When starting a new row, leave space to business relationship for the panel overhang on both sides, as well as a ½- to 1-inch clearance gap between the panels.
Step iv: Getting Panels On Your Roof
Retrieve: rubber first! As you fix to move your panels onto the roof, keep in heed the safety procedures outlined in the Planning & Safety section of this guide. Be certain to wear protective equipment, employ fall protection, and never stand on panels or elevator them by the electric wires.
If you want, you lot tin wrap your panels in a blanket to protect them from hard surfaces equally y'all move them.
Lifting Methods
Chances are, y'all'll want to rent some equipment to assistance lift the panels on your roof. There are a few options to choose from:
Ladder Lift. A ladder with a conveyor chugalug mechanism on it to help motility heavy objects upwards and down the ladder.

Scissor Elevator. A lift which extends up and downwardly, as well every bit side-to-side. The horizontal motion means yous can take fewer trips from the ground to the roof and then back over again.

Boom Lift. A lift with a full range of movement, giving you admission to tight spaces. Useful to get over and effectually obstacles that prevent y'all from parking a elevator directly under the spot where yous plan to install your panels.

Scaffolding. Scaffolding works corking if at that place are no obstacles and you don't need elevator assist. At that place'southward no mechanism to make lifting easier, but information technology does offer a sturdy platform to work on and some extra fall protection.

Step v: Mounting Panels
Now that you've got your installed racking and panels in the same identify, y'all tin finally put the ii together and mount your panels!
The instructions outlined below utilize the IronRidge racking system (XR10, XR100, and XR1000), which comes standard with all of our packages, as an case. If you purchased a specialty mountain (similar a pole mount), consult the product manual for instructions on how to mountain your panels.
- Place the panel so the mounting holes line up with the rails.
- Use the IronRidge UFO (Universal Fastening Object) clamps to secure the panel in place. Start with the end on the exterior border of the array and driblet the T-commodities in the slot in the rail.
- Torque the UFO clamps with stopper sleeves (one in each rails) so they are snug against the exterior of the first console, locking it into place.
- Slot the next pair of UFO clamps on the inside edge of the first panel.
- Identify the next panel on the runway, so that the clamps are wedged snugly between both panels.
- Tighten the clamps betwixt the panels.
- Echo this procedure for each panel in your array. Use the UFO with stopper sleeves attachment to secure the last panel in the row.
Footing Mounting
If you determine instead to footing mount your solar panels, at that place are 3 cardinal steps:
- Build a foundation
- Install racking railing
- Mount panels on your rail
Step i: Building a Foundation
Though ground mounting is quite a bit different from roof mounting, some of the same principles apply. First, you'll want to construct a solid foundation upon which you'll mount your racking track.
Our ground mount racks use the IronRidge Ground Mountain arrangement. We provide an technology report that specifies how deep and wide to dig anchor holes, pier spacing, and placement, as well as how much concrete and pipe to buy.
Follow the specs outlined in your Engineering Study (provided by Unbound Solar®) to ensure the structural integrity of your footing mount.
Pouring Concrete & Setting Piers
E'er utilise proper protective gear (outlined previously in Planning & Safety) when working with concrete. Moisture concrete will cause serious burns if exposed to the skin for prolonged periods. In addition, a respirator with a minimum rating of N95 is required when working near concrete dust.
Bearing rubber precautions in mind, here are some guidelines for pouring concrete & setting upward piers.
- Bank check if your site is level. Because leveling the course if necessary.
- Utilise chalk or a string line to mark the outer dimensions of the array and the locations of your piers on the footing.
- Call the local authority to locate buried power lines and septic systems before you dig. Do not drive heavy machinery (similar a cement mixer) over the cached lines.
- Carefully follow the pier placement and pigsty depth/width outlined in the engineering report.
- Create a temporary lumber substructure to go on piping in identify while the concrete hardens. If pipes move before the physical is fully cured, that can compromise the structural integrity of the mount.
- Underground pipe should be fully suspended in physical. If the pipe touches the dirt, information technology tin can crusade galvanic corrosion that volition detract from the force of the construction.
- Get everything else in place before you mix your concrete. Once the concrete is moisture, you won't have time to adjust forms and make changes.
- Wait at least a week between setting piers and building the rest of the array. Concrete will take up to 21 days to fully cure. Leave the wooden caryatid in place until the concrete is fully cured.

Step ii: Installing Racking Rails
Your Racking Report volition specify track size and spacing for your system. Keep information technology handy during this stride.
- Space the track to friction match the distance betwixt the mounting holes on the back of the solar panel. Your racking report has the exact measurements.
- The Ironridge Footing Mountain system uses a runway connector subclass which attaches the rails to the horizontal support pipes using U-bolts.
- When starting a new row, leave space to account for the panel overhang on both sides, equally well as a ½- to 1-inch clearance gap between the panels.

Step 3: Mounting Panels
With your racking rails installed and housed in a solid concrete foundation, your panels are ready to be mounted.
The instructions provided below use the IronRidge ground mount racking system as an instance. If you purchased a dissimilar racking solution (such every bit a ground mount system from Unirac), consult the product manual for instructions on how to mount your panels.
- Identify the panel so the mounting holes line up with the runway.
- Use the IronRidge UFO (Universal Fastening Object) clamps to secure the console in place. Outset with the end on the outside border of the array and driblet the T-commodities in the slot in the rail.
- Torque the UFO clamps with stopper sleeves (ane in each rail) so they are snug against the outside of the offset panel, locking information technology into place.
- Slot the next pair of clamps on the inside border of the get-go panel.
- Place the next panel on the rail, so that the clamps are wedged snugly between both panels.
- Tighten the clamps between the panels.
- Repeat this process for each panel in your array. Utilise the UFO clamps with stopper sleeves to secure the last console in the row.
Solar Bombardment Installation
If you're installing an off-grid system (or a grid-tie organization with a battery fill-in) the terminal pace of installation for your system will be to install a bombardment banking concern.
There are 3 types of batteries used in solar storage systems:
- Flooded Lead-Acid Bombardment
- Sealed Lead-Acid Battery
- Lithium-Ion Battery
Each of them has unique requirements in terms of installation and battery room design, detailed in the sections beneath.
Lastly, be certain to consult the manufacturer'southward installation instructions and datasheets (such every bit this manufacturer's guide for Crown batteries) for important installation instructions. We have provided some general guidelines in this solar panel installation guide, but each manufacturer does things a chip differently, and then information technology'southward best to refer to their specific guides when in uncertainty.
Safety Tips
As with every pace of the solar panel installation process, proper condom precautions should e'er exist taken. Before working with batteries, review the following safe guidelines:
Safe Guidelines For All Batteries
- Be careful to never short-circuit a battery! A short circuit occurs when the positive and negative terminals of a bombardment are connected together, either from improper wiring or when a metallic object falls onto the battery terminals. Use insulated tools and exist cautious to avoid brusque circuits.
- Remove all metallic jewelry, including watches and rings. Secure whatsoever long pilus and avoid loose-fitting clothing that could become defenseless on wires or terminals.
- Always wear protective gloves and safety goggles when working with your batteries.
- Proceed a multimeter with fresh batteries on hand. Use information technology to check conductors to verify voltage and polarity.
- Ensure that all wires are stripped and/or terminated properly using a torque wrench/driver when necessary.
- Route all wires away from sharp edges and pinch points that could penetrate and impairment the wire.
Boosted Prophylactic For Flooded Lead-Acid Batteries
- Go along baking soda and an centre-wash kit on-mitt. Blistering soda is used to neutralize acid spills.
- Ever wear nitrile gloves and rubber goggles when working with flooded pb-acid batteries.
Battery Room Designs
Your bombardment bank should be installed in an enclosure to limit accidental contact with the batteries. The enclosure should let for ventilation and exit enough infinite for batteries to cool effectively.
While you lot will demand to consult your wiring diagram and manufacturer'southward manuals for specific installation instructions, this section contains wide advice well-nigh designing and installing a safe enclosure for each kind of battery banking concern.
Sealed Lead-Acid & Flooded Pb-Acrid Battery Room Design
Heat has a major touch on battery lifespan. While batteries tin can safely operate in a broad temperature range, the ideal ambient temperature for your bombardment bank is 77°F.
Prolonged exposure to higher temperatures will shorten battery lifespan, while lower temperatures reduce battery chapters. Install your battery bank in a temperature-controlled surround to keep them every bit close to the target temperature as possible.
That said, natural fluctuations in room temperature based on fourth dimension of 24-hour interval and seasonal factors are perfectly adequate. The chief business concern is prolonged exposure to extreme temperatures. According to Battery Academy, batteries lose half their lifespan for every 15°F of continuous exposure over the ideal temp of 77°F.

Considerations for Sealed Pb-Acrid Battery Rooms:
- Keep a whiteboard or notepad in the room to record battery data during maintenance checks. You lot can also use the Battery Maintenance Log provided at the end of this solar console installation guide.
- Sealed atomic number 82-acid batteries practice not off-gas as a normal part of operation, but they still have valves that volition open if they are overcharged or overheated.
- Make sure the flooring is structurally sound and can hold the weight of the batteries.
Considerations for Flooded Lead-Acrid Battery Rooms:
- Flooded lead-acid batteries should be installed over a spill containment tray.
- Keep a whiteboard or notepad in the room to tape battery data during maintenance checks.
- Flooded batteries off-gas hydrogen when they are charging and must be installed in a properly vented battery enclosure that is congenital co-ordinate to burn and electrical codes. Consider buying a hydrogen gas monitor and don't keep anything in the room that could ignite the gas.
- Make sure the flooring is structurally audio and can hold the weight of the batteries.
Lithium-Ion Battery Room Design
Temperature can have a major affect on battery functioning. Li-ion batteries tin can be sensitive to extremely cold temperatures and typically cannot handle existence charged beneath freezing (32°F/0°C).
Bank check your battery manufacturer'due south guidelines on the acceptable temperature range for charging and discharging the batteries. Install batteries in a temperature-controlled environment to go on them within the recommended operating range.
Considerations for Lithium-Ion Battery Rooms:
- Keep a whiteboard or notepad in the room to record battery information during maintenance checks.
- Make sure the floor is structurally sound and can hold the weight of the batteries. If mounting on the wall, make sure the wall is structurally audio to back up the load.
Battery Bank Installation
Unsurprisingly, battery bank installation methods will be different depending on type and manufacturer. Included beneath are some general guidelines to follow while installing your batteries, arranged by battery chemical science.
Sealed Lead-Acrid Battery Installation
- Though your batteries are sealed, they may release a modest amount of combustible gas if overcharged/overheated. Do not install it shut to electrical equipment or appliances that could discharge sparks.
- Batteries should be well-ventilated to keep them in a safe temperature range. Ventilation and other installation requirements for battery systems are covered under NEC article 480.10.
- The battery case should not come up in contact with organic solvents or adhesive materials.
- Use UL-listed terminal lugs on battery interconnects, crimped according to the manufacturer's guidelines.
- Exit at to the lowest degree i inch of space between each battery to provide adequate ventilation and cooling.
- If the batteries volition exist subject to vibration (for example, in an RV system), spike the battery depository financial institution securely and consider using shock-absorbent textile inside the enclosure.
- Practise non attempt to dismantle or affect the inside of the battery! Sealed lead-acrid batteries will non leak nether normal weather condition, but they could spill if they are damaged. If adventitious contact is made with the electrolyte, wash the affected expanse with liberal amounts of water, and seek IMMEDIATE medical attention.
- Baking soda tin can be used to neutralize small acrid spills.
Ventilating Sealed Lead-Acid Batteries
Sealed Lead-Acid Batteries practise not off-gas as a normal part of functioning. Yet, they still take vents to relieve internal pressure level in case of overcharging. If the bombardment is exposed to overheating, excessive voltage or electric current, information technology will release gas.
Though off-gassing is rare for sealed batteries, it could notwithstanding happen in a worst-instance scenario. Because off-gassing is possible, the bombardment enclosure needs to be ventilated properly. In many cases, edifice codes volition use the same requirements every bit they do for flooded lead-acid batteries.
Your vent should be at the acme of the battery enclosure at the highest point so the hydrogen can escape. Seal any conduit to forbid hydrogen gas from going through your conduit and into your inverter and other equipment. Besides, be sure there is nothing blocking the vents so that air can circulate freely.
Flooded Lead-Acid Battery Installation
- Wear nitrile gloves while installing or maintaining your batteries to forbid exposure to the bombardment electrolyte.
- Batteries should be well-ventilated to keep them in a safe temperature range and preclude the buildup of hydrogen gas. Ventilation and other installation requirements for battery systems are covered nether NEC article 480.10.
- The battery instance should not come in contact with organic solvents or agglutinative materials.
- Use UL-listed terminal lugs on bombardment interconnects, crimped according to the manufacturer's guidelines.
- Leave at to the lowest degree 1 inch of infinite between each battery to provide adequate ventilation and cooling.
- If the batteries volition be subject to vibration (for example, in an RV system), fasten the battery banking company deeply and consider using daze-absorbent cloth within the enclosure.
- Practice non attempt to dismantle or affect the inside of the battery! Bombardment acid will burn your skin. If accidental contact is made with the electrolyte, wash the afflicted area with liberal amounts of water, and seek IMMEDIATE medical attention.
- Blistering soda can be used to neutralize small acid spills.

Ventilating Flooded Lead-Acrid Batteries
Flooded lead-acrid batteries off-gas a small corporeality of hydrogen gas as a normal part of their functioning. The bombardment room must be well-ventilated to keep the Hydrogen gas levels beneath a safe threshold (less than 1% concentration by volume).
Battery rooms should exist ventilated at a minimum rate of 1.5 cubic feet per minute. Make certain there is null blocking the vents so that air can circulate freely. Larger systems volition typically use a battery vent fan to actively expel gases.
Since hydrogen gas is lighter than air, information technology will ascent upwards in the enclosure. Your vent should be at the top of the battery enclosure at the highest point so the hydrogen can escape. Be sure to seal any conduit to preclude hydrogen gas from going through your conduit and into your inverter and other equipment.
Hydrogen gas is very corrosive and combustible in high concentrations, which makes proper ventilation extremely of import.
Lithium-Ion Battery Installation
- The battery case should not come in contact with organic solvents or adhesive materials.
- Use UL-listed terminal lugs on battery interconnects, crimped according to the manufacturer's guidelines.
- Go out at least one inch of space between each battery to provide adequate ventilation and cooling.
- If the batteries will be subject to vibration (for example, in an RV organisation), fasten the bombardment banking company securely and consider using stupor-absorbent material inside the enclosure.
- Practice not attempt to dismantle or touch the inside of the bombardment! Follow the manufacturer's guidelines for any troubleshooting procedures.

Battery Wiring
With your batteries safely installed in a suitable room, all that's left to practice is wire them together. Every bit with installation, be sure to follow the wiring instructions provided by the manufacturer of your batteries.
However, at that place are some general rule-of-thumb guidelines that we recommend:
Bombardment Wiring Guidelines
For wires connecting the battery bank:
- All interconnection cables should exist the same wire size and length.
- Do non identify annihilation between the battery final and the band terminal of the interconnect cable.
- Brand sure all connections are torqued properly. Re-bank check them when you lot perform battery maintenance to make sure they are secure. Connections that are loose or excessively tight tin cause melted battery terminals and other failures.
For wires running from the bombardment bank to the inverter(s):
- Keep the battery depository financial institution and inverter as shut together every bit possible.
- Positive and negative cables must be of the same length.
- Positive and negative cables should exist zip tied together every 18 inches and installed in the same conduit to maintain maximum surge capability and reduce electromagnetic interference.
- Road your cables then that they do not interfere with the ventilation of the battery enclosure.
Get Started On Your Solar Panel Installation
We hope this solar console installation guide has helped familiarize you with every stage of the solar organization installation procedure. While we accept gone over full general steps and guidelines, every unmarried solar installation projection is different and comes with its ain unique challenges.
If you lot take any specific questions related to your solar system installation, please feel costless to contact u.s.a.. We're dedicated to helping you go the right system for your needs, and providing support throughout the entirety of your installation process!


Source: https://unboundsolar.com/blog/step-by-step-diy-solar-installation
Posted by: foxtheacted.blogspot.com
0 Response to "How To Install Paneling Video"
Post a Comment